
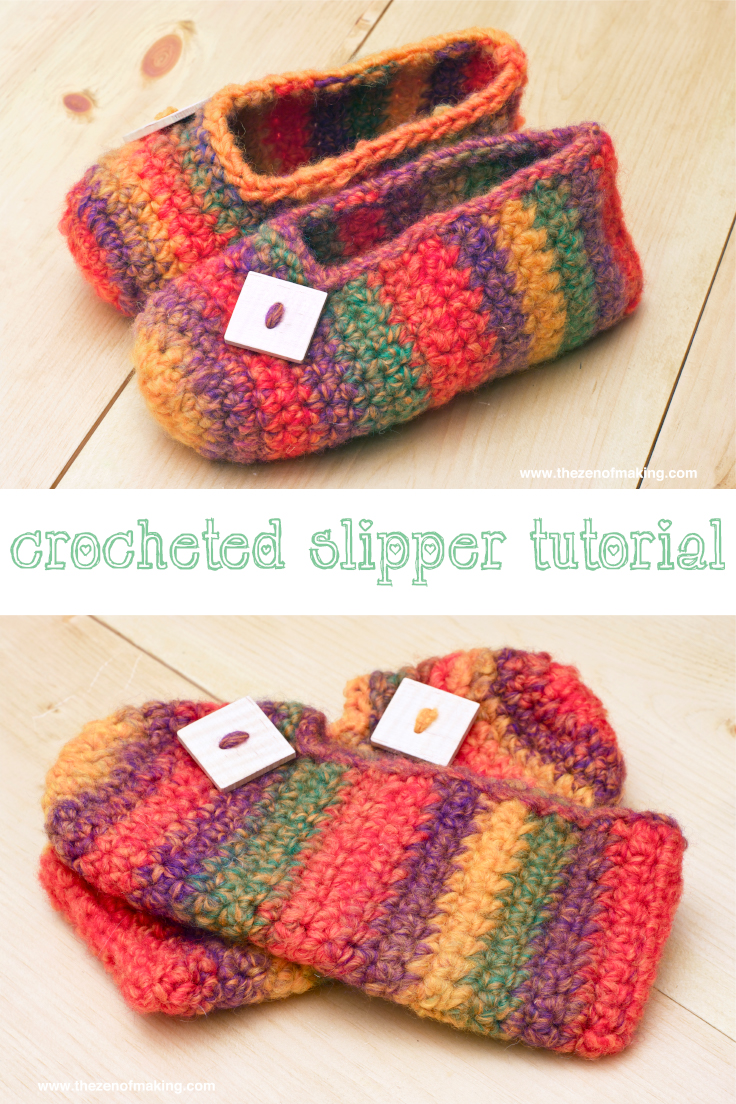
Make a cozy pair of crocheted slippers with this quick and easy rainbow striped slipper tutorial!
In the photo above, the finished rainbow slippers were each completed using one skein of self-striping Da Vinci yarn from Lion Brand Yarn. If you use this yarn, you will not need to make color changes as you crochet. (Different yarn colors in the tutorial photos below indicate different parts of the pattern. Do not change colors in your own project.)

Pattern notes: This pattern makes one pair of crocheted slippers in women’s size 7-8 US/men’s size 5-6 US. Instructions are included below for lengthening or shortening the pattern for other adult shoe sizes. The slippers are designed to be wide enough to accommodate thick socks, and they will stretch slightly with wear. To get a snugger fit, try sizing down or using a smaller hook and adjusting the pattern as necessary.
 |
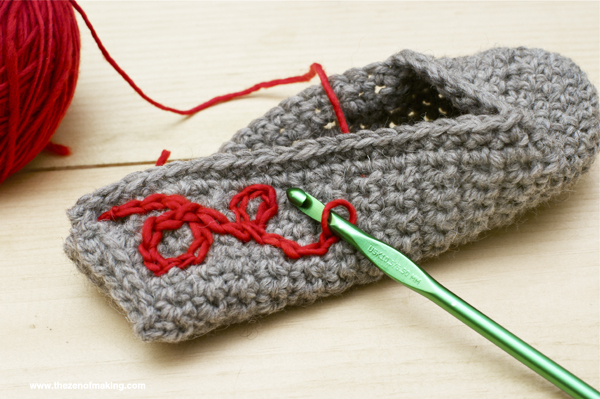
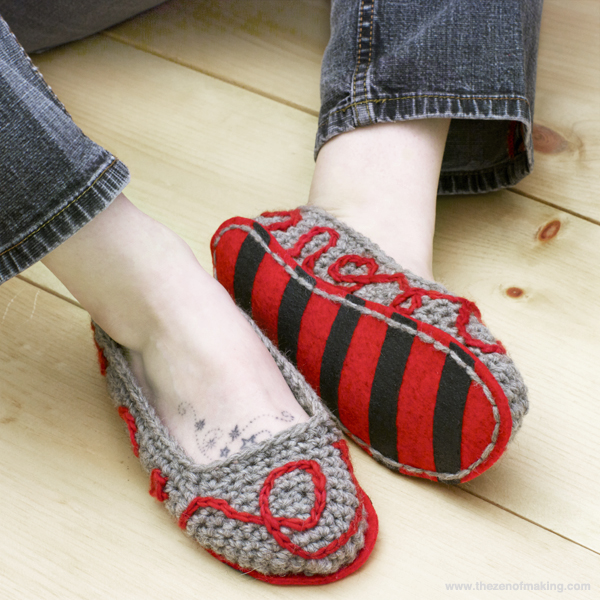
Want to make a pair of ballet flat-style slippers like the ones in my crochet embroidery and felt slipper soles tutorials? See rows 10-26 for the pattern adjustment. |
Supplies:
* 2 skeins Da Vinci by Lion Brand Yarn (super bulky), Autumn colorway
* 2 wooden buttons, 1" square
Tools:
* Crochet hook, 9mm (US size M)
* Darning/yarn needle, large
* Scissors
If you’re ready to learn the basics of crochet, check out the Crochet 101 video tutorial that I made for CRAFT!
**Please note that the links provided above are affiliate links, and I will be compensated if you choose to make a purchase after clicking through.**
CROCHETED RAINBOW STRIPED SLIPPERS
ch: chain
sc: single crochet
sl: slip stitch
st: stitch
The Toe of the Slipper
The first part of the pattern is worked in the round.

Ch 3 and join with a sl st in first ch.
Round 1: Ch 1, work 8 sc in ring, sl in first sc to join. (8 sts.)
Round 2: Ch 1, work 2 sc in each sc, sl in first sc to join. (16 sts.)
Round 3: Ch 1, *work 2 sc in sc, sc in next sc; repeat from * around, sl in first sc to join. (24 sts.)

Round 4-9: Ch 1, sc in each sc, sl in first sc to join. (24 sts.)
The Foot and Heel of the Slipper
This part of the pattern is worked flat in rows (back and forth) instead of in the round.

Row 10-26: Ch 1, sc in 20 sc, turn. (20 sts.) Fasten off and weave in the end.
This pattern creates a slipper that will fit a women’s 7-8/men’s 5-6 shoe size. For larger or smaller sizes, increase or decrease the number of rows as needed. When making adjustments to the length, keep in mind that the slippers will stretch out a bit when they are worn, so the final length should be an inch or two shorter than the actual length of your foot.
|
Pattern adjustment: To make a pair of ballet flat-style slippers (like the ones seen in my crochet embroidery and felt slipper soles tutorials), sc in 16 or 18 stitches in rows 10-26 to make a wider foot opening. |
Finishing

Join the two sides of the heel together with sl stitches from bottom to top. Fasten off and weave in the ends. (You can sl on either the outside or inside of the slipper.)

Once the heels are joined, sc all the way around the top edge, starting at the center of the heel and working your way around the slipper opening. Sl into the first sc to join. (You can also sl all the way around the edge if the top is getting too bulky.) Fasten off.

Cut a 6" length of yarn, then use a darning needle to sew the button in place on top of the slipper.
To finish the slippers, weave in all ends.


Enjoy!
Here are the tutorials that you’ll need to get the job done:
|
|
|
|
absolutely fabulous tutorial! ♥ it!
Thank you! They’re really comfy. :)
Hermosos los tutoriales. Gracias por tu generosidad. Te admiro
I showed these to my husband and all he could say was “why can’t you learn how to make that for our daughter?” I’m only in the middle of making her a rug, mobile and custom bibs! Sheesh. Wish I knew how to crochet though, these are fantastic!
There’s a link to my Crochet 101 video tutorial in the post. Just sayin’. ;)
These slippers are in adult sizes though. If you do decide to try, shoot me an email and I’ll try to adapt the pattern for you.
Could you please post or send a pattern for child size 5 to 6 . Thank you . :))
Hi Lynn,
Unfortunately, since I don’t have any kids in my household, I have absolutely no idea what size a child-sized 5-6 slipper would end up being. (Turns out, kid feet are not nearly as universally scalable as adult feet, where you can just add or subtract some length and the pattern will fit most people!) To adapt the pattern, I recommend trying smaller yarn/smaller hooks (maybe start with worsted weight) until the toe of the slipper is the correct circumference to fit around the child’s foot, then work as many rows for the foot/heel as needed for slippers to be the right length. Best of luck!
If you wrap a sock round your fist toe to heel -round from knuckle back to knuckle the sock will fit your foot ?! Seriously try it with kids adults alike not stretch size 10 will fit hubby 6 you so on so forth so next time you have said child near by a piece of yarn wrapped round her./his hand should determine the size of their tootsies
Just whipped up a pair for my cold little piggies and they turned out great! Thanks for for the easy to follow pattern and pics.
Hooray! So glad you liked the pattern. :)
So cute and EASY! Just found this and can’t wait to dig out some yarn and make a pair. My grandmother taught me to crochet years ago while watching football after Thanksgiving dinner and I never learned to follow a pattern. I always had to see it. This is a pattern I can see I can follow. If I get busy I could make some wonderful Christmas gifts.
Jan
Did you notice that is has already been added to Ravelry? But no picture yet…
I saw it right after I added it myself. Oh well–guess it’s on there twice!
Hi. I wear a size 10. How do I figure out how to accommodate my feet? Thanks
To lengthen the slipper, add additional rows to the “Row 10-26” section of the pattern, stopping when the slipper is long enough to fit your foot. (Keep in mind that the slippers will stretch a bit with wear, so you’ll want to make them slightly shorter than the length of your foot.)
This is super cute… and it looks very easy to make…
Just whipped up a pair for my hubby who wears size 15 :)
PERFECT
How many rows did you do for the size 15? My brother wears a 16, I thought it would help to know how many you did. Thanks!
Mary
is there a printer-friendly version available?
There’s a print/PDF button below the post with the rest of the social media and sharing buttons. :)
That’s just so amazing
Saw these on pinterest & love the style & color, even better, pattern looks simple. I’ve never crocheted slippers & I wear a size 10 also. When you resize, do you just add on to the length, or do you need to add onto the width also? Thanks!
The slippers stretch, so you should only need to add length. If you’re unsure, you can always try them on every once in a while as you crochet to make sure the fit is comfortable. :)
I just love the pattern and the yarn that is used and therefore lays the problem. I wanted to make the slippers using just that yarn, but it’s made using wool. The slippers are for my beloved aunt and she’s allergic to wool. Can you help me? The minute I saw them, my heart set on the beautiful colorist you used. Can you give a suggestion of another yarn (hopefully wool free) that would give close to the same results. Thank you so much, Earlene Wallace.
Hi, Earlene. Thanks for commenting! I too am allergic to wool, but I haven’t had much trouble with my slippers–but I generally wear socks with them. I can’t think of a non-wool self-striping yarn in similar colors off the top of my head, but you might want to check out the Hometown USA yarns from Lion Brand Yarn (it’s an acrylic yarn made by the same company that produced the yarn that I used for the slippers): http://www.lionbrand.com/cgi-bin/yarnInfo.cgi?start=0&yarnPage=1694622&pageLength=100
You’d have to crochet the stripes in the slippers individually–and buy a lot more yarn than you need–but Hometown USA comes in many of the same colors that are found in the Da Vinci wool yarn. I hope that helps!
I just got Lion Brand “Landscapes”. I’m allergic to wool also, but this yarn is 100% acrylic, plus it’s self striping, ridiculously soft, and comes in tons of gorgeous color ways! I don’t know if it comes in one similar to the pictures, but I’m sure you will find one you like.
I was just curious if it makes a big difference starting with the ch3 and then sc8 in the loop, or if starting with a magic circle sc8 would work as well. Thanks!
A magic circle sc8 should work just fine!
I’ve already made about a dozen of these wonderful slippers for an upcoming family get-together. We have new carpeting and I’m hoping they will inspire everyone to shed their shoes and grab some slippers. My question is; how do I reduce the size for kids? I’ve tried on my own but they look goofy! Thanks for this great and easy-to-follow pattern!
Encantadores los probare se ven lindisimos
un beso
Thank you for sharing made them fast and easy love the pattern happy holidays to u and family
I love these slippers. My grandmother used to make these for our family when we were little. I always wished she would of had a pattern written down to follow, but she did them by memory. I think I will try and make a pair for my parents, brothers , husband and my children for next Christmas. What a wonderful gift as well as treasured memory for all. Thank you!
Loved your tutorial. Very uncomplicated to where anyone can understand. I actually made these while watching the tutorial. Keep up the good work on these tutorials. Very Good!
Thanks for the great pattern! I used felt + anti-slip mat for the soles. Really fun little project. My mum is going to love them! There is pics on my Ravelry account.
http://www.ravelry.com/projects/queenboozy/rainbow-striped-crocheted-slippers
I LOVE these!!! I am a beginner, and they were so easy. They bring back fond memories of my grandma and her Christmas gift of knit slippers. I am on my 5th pair for friends and family. Thank you for the pattern!
Thank You for this very easy..fun. free
pattern..
I love Learning this new hobby with you!
Hi Haley, I have never made slippers, and , these are gorgeous. My question is can I make these with a real light weight yarn? I live in So. Calif. and weather here is very mild year round. If so, which yarns and hook size? Thanks so much for any info you may have. Sandy
Sure! (Though, the bottoms will probably wear out faster.) When you pick out a yarn, use whatever hook size is best for the yarn weight. (The yarn label should indicate which hook to use.) To adjust the pattern, after round 3, you’ll need to continue working rounds in a flat circle until the toe is wide enough, then proceed through the rest of the pattern, adding extra length where needed to accommodate your lighter weight yarn.
Great tutorial, love the colours in the variegate.
I made these and they’re wearable! I’m slow as heck, lose track of stitches, frog most of my “projects”, but the second one only took me an hour, which is amazing (for me)! Best part…..they’re the same size and everything! Thanks for the pattern, I’m feeling quite crafty right now :)