

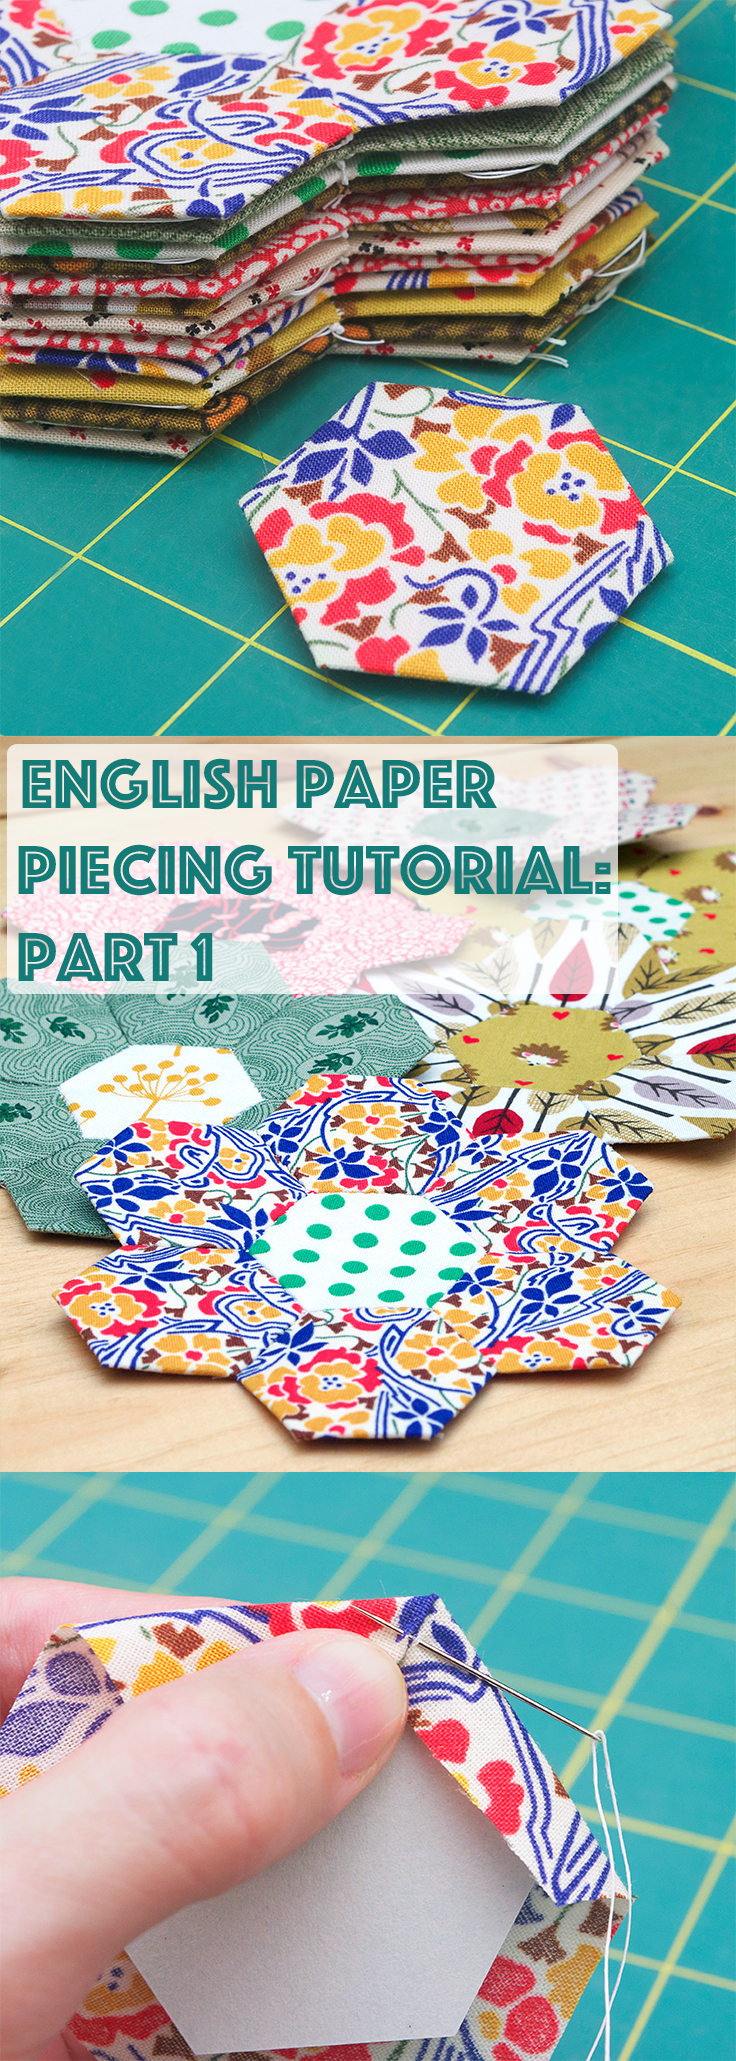
Got fabric scraps? Get quilting! Jumpstart your hexie obsession with my free 1" hexagon template and part one in my English paper piecing tutorial series!
As you all know, I’ve been making hexies nonstop since last month’s trip to Portland. And, because so many of you have asked questions or expressed an interest in learning how it’s done, I decided to put together a series of posts on the basics of English paper piecing. The first post (this one) will show you how to make a hexie, the second post will take you through the process of joining your hexies into a quilt block or geometric pattern, and the third post will show you how to incorporate a finished hexie quilt block into a project. The English paper piecing method that you’ll learn in this series is the method that Diane Gilleland generously taught me during my Portland visit.
Beyond quilts, what else can you make with hexies? Check out Diane’s giant hexie placemat project and her post on rescuing old quilt blocks with English paper piecing for great examples of non-quilt projects!
Before you get started, you should know that making one hexie may lead to a serious hexie addiction. Don’t say I didn’t warn you.

Please note that the links to supplies and tools that are provided below are affiliate links, and I will be compensated if you choose to make a purchase after clicking through.
Supplies:
* English Paper Piecing 1" Hexagon Template PDF, printed on cardstock at actual size (full scale)
* Cotton fabric scraps or fat quarters, two contrasting prints or colors
* Hand quilting thread, a color that will blend in with your fabrics
* Glue stick
Tools:
* Fabric scissors
* Hand quilting needle
* Paper scissors
Before you begin:
Print the English Paper Piecing 1" Hexagon Template PDF at full scale on cardstock, then carefully cut out the individual hexagon shapes.

Step 1
Apply a small smear of glue to the back of a hexagon template.

Step 2
Press the template in place (glue side down) on the wrong side of the fabric, centering it on the part of the pattern that you would like to display on your hexagon.

Step 3
Use your fabric scissors to cut the fabric out around the template, leaving a ¼" to a ½" seam allowance around the template.

Step 4
Fold the fabric snuggly over one edge of the template and finger press the crease.

Step 5
Fold the fabric over the next edge, creating a nice sharp corner where the two sides meet. Finger press this crease too.

Step 6
Thread your needle and knot off the end, then insert the threaded needle into the folded edge of the fabric on both sides of the corner, just below the point. Take care NOT to sew through the hexagon template.

Step 7
Pull the thread through the fabric until you reach the knot at the end, then reinsert the needle into the same place in the fabric.

Step 8
Pull the thread all the way through the fabric one more time, completing the stitch and securing the corner.
Note: These are basting stitches that are used to hold the fabric in the correct shape around the template as you sew. The stitches do not need to be deep or large, and you should never sew into or through the paper template. In most cases, the stitches—along with the paper hexagon template—will be removed once a project has been pieced together. (That said, if the fabric is thick enough that the stitches aren’t visible in your finished project, you can just leave them in. It’ll be our little secret.)

Step 9
Fold the fabric over the next edge and secure the next corner by following the instructions above.

Step 10
Continue folding the fabric over the template and placing stitches at the corners until all of the corners have been secured in place.

Step 11
When you get back around to the first edge that you folded, bring the needle through the center of the folded fabric and clip the thread, leaving a short tail.


Step 12
Inspect your finished hexagon to make sure that the edges are straight, the fabric is stretched evenly, and the corners are sharp.
To prepare for part 2 of this tutorial, follow the steps above to make a total of 6 hexagons in the first fabric pattern/color and one hexagon in the second fabric pattern/color.

In the next post in my English paper piecing series, I’ll show you how to join the hexagons together to create a quilt block or a geometric pattern!
Yaaaaaayyy! I’m so excited to see this tutorial series! Hexies are just so much fun to play with, and your how-to should make a whole lot of new addicts. :-) Seriously, though, beautiful photography and documentation of the process here. Thank you so much for sharing my project links! XO
Thanks, Diane! I’m so, so, so glad you gave me hexie lessons while I was in PDX. Best skill transfer EVER.
I got hooked on hexagons 10 yrs ago when a friend gave me 50 pre-cut vintage hexes. I continued to cut and sew flowers for “Grandmother’s Flower Garden” until I realized I had 2 sizes of flowers. I now have a twin size comforter, a lap quilt and many more flowers to use…I look forward to seeing what you do with them
Nice! I haven’t given pre-cut a try yet–I’m still trying to work my way through my fabric scrap stash. :)
How many hexies would I need for a king sized quilt please. Prob in 2 inch hhexies
Hello. I’m not sure how many hexies you’d need, but I’m sure there are plenty of quilting calculators online that could help.
Wonderful! Something creative and portable!
Sorry to be coming to this party a bit late!!! But had it on my to do – MUST to do list – to definitely pop over to read your tutorial! Honestly, there are so many how to hexie tutorials out there in blogland but I have to say this one is absolutely one of the prettiest and well done. You really did a gorgeous and thorough job of presenting the basic hexie making steps here. And on top of that you have inspired me to follow along and create a hexie block! Just bought the fabric today!!
Thanks so much, Pam! I can’t wait to see your block.
OK, all of u pro quilters, please do not laugh too loud, but as a newbie to the quilting world, I have a maybe dumb question. I have sewn drapes, comforters, clothing, etc, but I want to try quilting now and I want to start with this hexagon pattern. My question: do I remove the hexagon templates after sewing or leave them in. I want to make a quilt for my bed. U can giggle now.
Yep, the paper templates are removed at the very end, once the quilt top/project is all stitched together. I’ll get to that step in part 3 of this tutorial series! :)
Thank u so much. Now, let the games began.
Thank you for asking this question-I made a bunch of hexies years ago (20+), and couldn’t remember when I had taken out the paper pieces! Duh! Don’t feel stupid about asking this question-I bet there are a lot of folks who are wondering…… :)
Just in case you haven’t gotten to part 3 of the series yet, I cover template removal in the middle of the project: https://www.redhandledscissors.com/2013/08/tutorial-english-paper-piecing-travel-kit-hexies-part-3.html :)
I have found that the pieces are easier to handle – stiffer – if you leave the paper in until the end.
what a great tutorial. I have done english paper piecing before, but have not seen this technique where you do not sew through the paper! Sew much easier. Your fabric choices are sublime. Thanks so much for sharing.
Thanks, Pam! Hexies give me the perfect excuse for using up all of those little fabric scraps that I just can’t bring myself to throw out.
I have never really been that interested in quilting …. until now! I love this simple idea of using paper templates and can’t wait to try. I am also thinking of making them with paper, not fabric, then framing an interesting grouping of them. I am a paper addict and have tons of paper so a way I go! Like many of the others who have commented here, I agree that your tutorial is well thought out and so very easy to follow. Thank you so much for taking the time to teach us.
Lis
So glad I could help pass along the hexie addiction! I love your paper idea too–I’m sure you’ll come up with something fantastic. :)
How in the world can you cut those templates when they’re connected like that? I can’t imagine you could cut them accurately.
I like to just use paper clips to hold the fabric to the template. Glue is messy and you have to soak the glue out of the fabric when you’re done.
Cutting out the templates with a pair of sharp paper scissors works just fine for me, but I’d definitely recommend using a ruler and an X-Acto knife to anyone who’d rather have a guide when cutting multiple straight lines.
As for glue, I haven’t really had any trouble with the tiny amount that I’ve been using–especially since it’s a glue stick and doesn’t soak immediately into fabric like a liquid adhesive would. I find that the small spot of glue stays just tacky enough for the template to stick to the fabric while I get the first stitches in, but it generally stays on the paper, not on the fabric, once it’s dry and I’m ready to pop the template out.
That said, the paper clip method is great (as is the Clover Wonder Clip variation that I keep seeing from other quilters). I just use glue to avoid carrying around more small pieces when I’m stitching on the go. :)
I love doing hexies! I’m on my third project! I like to use hand quilting thread to baste and to sew them together. I fine the little heavier thread is easier to use and doesn’t knot as easily.
Very good instructions and pictures!
Hello, I am English and belong to a group making a quilt. We use 2 stiff card hexagons, one slightly larger than the other to allow for the folded-over edge. The larger hex is used to cut out the fabric and the smaller one for the papers. Scrap computer paper is ideal for those.
I have just started quilting at the age of 70. I’m not going to be producing intricate quilts, but I do enjoy it and get lots of inspiration from Favequilts.
OMG, I am getting ready to start to learn English Paper Piecing when I came across your blog with tutorials. They are great! Your photos and instructions are so detailed.
Last night, I use my Cricut to cut out TONS of 3/4″ and 1″ hexagons for EPP. I can’t wait to get started! Thanks so much for your explanations and inspiration!
I just knew there had to be a away around stitching the paper and fabric together and then spending an eternity unpicking the basting stitches at the end! Thank you so much! Now I will use the extra time (next time) on other projects! Cheers.
Have you tried using only glue? No thread? I did a hexie swap with some online friends and one friend made hers with no thread, just glue. They are very crisp and sharp. May be the hexie of the future?
I’m pretty partial to stitching, myself–especially when the hexies get bigger than 1″ or so. But I can see glue being a great option for smaller projects/smaller hexies. Thanks for sharing!
I am curious as to why do make your hexies out of cardstock instead of paper. Paper is MUCH easier to deal with.
I like cardstock because it holds up so nicely when I reuse the same templates for multiple projects. (In the technique I demonstrate in this tutorial, I don’t sew through the template at all, so the sturdiness of the cardstock isn’t a hinderance.) That said, if I’m making hexies that are much larger than the size shown here, I do sew through the templates, so then I find paper to be more ideal.
Hello, I started a grandmother’s flower garden over 22 years ago, when I first started quilting, and my sister showed me how to cut the hexies and just sew them together, using a 1/4 ” seam allowance. I put it away for years, but pulled it out awhile back. I just finished it, all hand quilted, and it’s really nice. I must say, at the time, I never thought of paper piecing, but can see the advantage of doing so. Beautiful work!!!
Thanks so much for your helpful advice on paper piecing! I’m in my 50s, have made several quilts by hand – even made small item of hexagons- but have never understood the piecing idea till now. I always wondered how on earth you’d tear out hundreds of papers from finished quilt (or would you leave them in and rustle every time you moved in bed?!) Now I see how it’s done! Thanks again.
Thanks for taking the time to do these tutorials with the beautiful photos! I have tried hexies only a few times, but now that you have supplied all the instructions that I need, they will become one of my favorite quilting pastimes when traveling, sitting in my recliner, etc. Thanks so much for the inspiration!
My pleasure! Happy stitching!
Just found the Travel Kit tutorial, it’s on the to do list. I’ve made two hexagon quilts, the first when I just left school 40yrs ago. I’ve always used card from old cereal boxes and pulled them out and used them over and over not sewing right thru. I had a template for cutting the fabric as well as one the actual size but I don’t think it’s vital to cut out the fabric exactly because it’s going to be folded round the template anyway-that’s the one that should be accurate.
Thank you for this brilliant tutorial. I found it so helpful with the hexies. I downloaded your template so that I could do EPP on my holiday last September, sadly I didn’t finish making anything with it but I have just seen your post again and it has inspired me to continue with it on this years holiday!
Sarah
6 years later… thank you so much for this tutorial! It’s really clear and gave me the confidence to finally tackle a sewing project for the first time ever. I found it completely addictive & will be working towards your travel kit so I can keep stitching while I travel.
Awesome! So glad the tutorial helped. :)
I don’t have a great sewing machine (but I have one, thank the Lord!) and I’ve only made a mini quilt (which came out all wonky and wonderful). I really have no room to quilt. I can’t keep my machine set up all the time and it really is a pain to get out and put away (on and on). Then I heard of this EPP and wondered if it might be for me?! I love to embroider and just made my little girl a patchwork book of colors (which I had to hand sew the pages together). I believe with that pre-existing knowledge, this tutorial, and your book (on hold at my library!), I am ready to start a quilt! Or maybe something smaller to start but it’s a start!
Thank you for sharing with me how to EPP.
How do you remove the card stock ?
Removing the paper pieces doesn’t happen until closer to the end of a project. Check out part 2 (https://www.redhandledscissors.com/2013/07/tutorial-english-paper-piecing-hexies-part-2/) and part 3 (https://www.redhandledscissors.com/2013/08/tutorial-english-paper-piecing-travel-kit-hexies-part-3/) of the tutorial to see all the steps.
Hello,
Does fabric grain factor into paper piecing? Does it matter where on the fabric grain the hexie is cut?
Grain doesn’t matter a whole lot in EPP, especially if you’re fussy-cutting to get certain fabric patterns or designs in your hexagons. Hand-piecing hexagons is a bit more forgiving than other kinds of sewing, since you’re pulling and stretching the fabric by hand–and around a paper template–as you work. (If you’re using fabric that isn’t woven quilting cotton, it could possibly matter more.)
Question – I am making a memory quilt, using pieces of fabric from a variety of sources – fabric from my grandmother, mom, my own sewing, my daughter’s sewing. They are varying weights and textures. Will it work to put iron-on pellon interfacing on the back of the fabrics the need stabilizing?
Yep, that should help. Using a washable iron-on interfacing is definitely what I’d do in that situation.
Hi and thank you for this series. I wondered if I could use them in the women’s craft group I run. It is a group of women recovering from mental distress and or addiction. I have no budget and most of the women live below the poverty line. I thought English paper piecing is the cheapest way to start them off quilting.
They want to eventually make quilts for children who go into care so the children always have something they recognise on their beds. Hopefully we will have some sewing machines donated.
Hello! As long as the women will be using the tutorials and patterns for personal enrichment and for making items for charity (not selling finished versions of my paper piecing travel kit for profit, for example), that would be just fine with me. I hope they enjoy the quilting process!
Thank you so much Haley. Your tute is well explained and illustrated. It will make it easy for us to follow.
I am finding the craft group brings out better discussions than our recovery and or support groups often. I think it’s because the women are feeling safe, relaxed and happy.
That’s wonderful, Sue–I hope the women in your group find stitching hexies to be as soothing and comforting as I do!
I wish there was a pdf download for this lovely set
There’s a downloadable PDF template in the supplies list for the first tutorial in this series (this one) and for the third tutorial in this series. Hope that helps!
Hi, nice tutorial! Do you place the hexies so that the material “weave” runs in same way? In other words do the salvaged sides all run either vertically or horizontally so that after washed half does not shrink unevenly? Sorry I hope you understand what I mean.
Hello! I do understand your question, and, technically, yes, all of your hexagons should be positioned in the same way on the fabric in relation to the fabric grain. (For hexagons specifically, straight grain cuts will probably yield the most accurate and consistent cuts with less chance of them being stretched out of shape.) That said, I’ll be honest and confess that I, personally, don’t worry about it very much—especially when fussy cutting to get specific pattern graphics in specific positions on a quilt block—and I haven’t really experienced any huge quilting disasters yet. *knocks on wood*
Hot tip: Pre-washing and drying your fabric before using it can minimize the problems that might come from stretching and shrinking, and is probably a good idea for items that will be laundered or for which maintaining perfect shape is important.
Great tutorial, I have a template that is easy to cut out many hexagons at one time, and I use a glue stick to put them around the fabric, which I had cut into 3 inch squares with my cutting wheel! I had washed and starched all the fabric before cutting and piecing! I got addicted and now have 9 (19 piece hexagons) hand sewn together, I am making a large quilt, hopefully when I am done! Can these be machine sewn together when I make the quilt?
Sounds like your quilt is going to be lovely! And, sure, you can mix machine sewing and hand-sewing, depending on your preferences. Though, for EPP, you might need to do some extra pressing and pinning of those larger hexagon blocks to remove the paper and line up the seam allowances before they’re ready for machine joining.
This is awesome. Do you make these for people?